Showing posts with label DIY. Show all posts

Saturday, June 14, 2014

DIY Fruit Wash

I don't always have the time to prep my fruit, but I really try to as often as possible. I love for my family to be able to just open the fridge drawer and have a big pile of fruit ready to eat. Especially now that we are all trying to be a bit healthier (and now that it's summer and all the yummy fruit is in season we are buying even more!)

But I don't love all the potential nasties that can be covering the fruit. There are all kinds of fruit washes you can buy if you want something a little tougher than plain water. But really, you can do it yourself with a little of that magical vinegar and a sinkful of water.

Most sites I've been to suggest a 3 to 1 ration of water to vinegar and that always works great for me. I was nervous at first that the fruit would pick up the vinegar and it would ruin the taste, but so far that hasn't been the case.


I run a sink of water, add the vinegar, and then dump in the fruit. Let it sit for about 10 minutes and then rinse under cold water, rubbing the fruit as you do.

The first time I did this I was shocked that I could actually FEEL whatever it is that is on the fruit washing away beneath the water. Especially on apples. I think it's the waxy substance they add to them to make them shiny. Whatever it is, it's NOT something I want my family to be eating.

(Strawberries soaking)

(What the water looks like after the strawberries soaked for 10 mins)

I usually lay the cleaned fruit out on paper towels to air dry for a minute while I get another batch going and then stack it up in the fruit drawer in the fridge.


My fruit lasts soooo much longer this way. So I don't worry about stocking up because I know it will last (though fruit goes pretty quickly in this house no matter what lol). Berries especially were a problem, going soft and mushy within a day or two. But after prepping with like this, they last...well, I'm not sure exactly how long they'll last as my kids don't let them sit long, but I've yet to have to toss any when before I'd have to throw away at least a few.

If your family stocks up on fruit like we do, this can be a little time consuming, but sooo worth it in the end. And if you buy smaller amounts, this really only takes 15 minutes or so. Definitely worth it!

Wednesday, June 4, 2014

DIY Ant Repellents

I'm fairly sure that my house is being supported by nothing but ant hills. I've actually seen two of them near my front steps *shudder* This is concerning in and of itself, but it's also a pain because the little buggers get inside the house no matter what I do or how clean the house is (and ha! Let's face it, a house with kids is rarely sparkling clean).

But with the kiddos and pets running around, I really don't like spraying poison. So I googled around and found a few natural solutions.


1. Citrus
Ants supposedly don't like citrus, lemon in particular. So, if you mix one cup of lemon juice with four cups of warm water and then wipe the mixture on counters, cupboards or wherever they are a problem. This is supposed to keep them away as they don't like the lemon scent

2. Cinnamon
Again, ants supposedly don't like the scent so if you dust cinnamon along problem areas it should get rid of them. This one I have tried (in very small areas). I do think it helps and it does smell much nicer than poison, however I don't like having trails of brown dust all over the place. I've also mixed it with water to make a paste and shoved it in cracks where I've noticed ants coming out and that wasn't quite as bad.

3. Baby powder
Supposed to work like the cinnamon. Just sprinkle it around problem areas.

4. Vinegar
Ah, another use for the magic that is vinegar. Mix this stuff 1:1 with water and spray on ant trails. I've also seen some people suggest adding a tablespoon of peppermint oil to the mixture.

5. Borax
There is a slightly more elaborate solution that apparently works really well. I found it at The Happy Housewife. You'll need 1/2 cup sugar, 1 1/2 cups Borax, 1 1/2 cups warm water, and some cotton balls or cloth. Head to her blog for full instructions but she had a lot of success with this method so it's worth checking out.


Monday, April 21, 2014

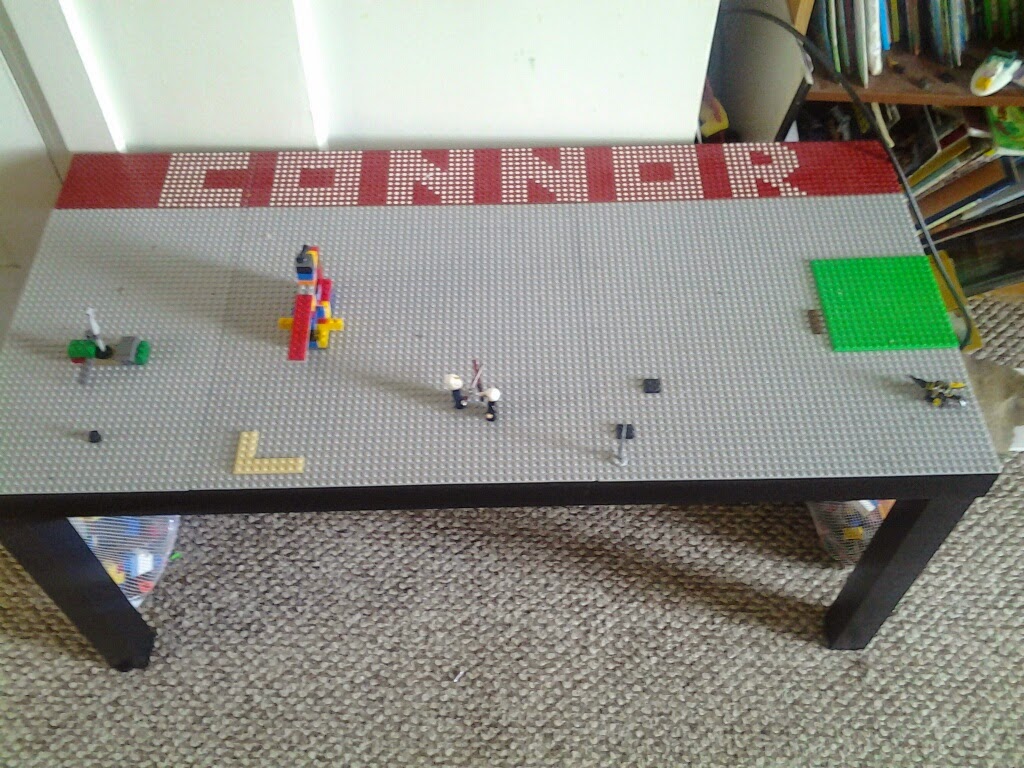
DIY Lego Table

Have you seen those adorable Lego tables they have for toddlers and little ones? I love them. My kids love Legos, but when they drag them out to the middle of the floor, I just cringe. Even if they clean them up (which they rarely do) a few always gets left behind. And I ALWAYS step on those horribly painful pieces of plastic ;-) Plus, my son always complained it was hard to build because the carpet was too soft. He wanted a Lego table. And so did I...so he could keep them contained LOL

But when I started looking around, most of the tables I found were made for toddlers...or were so expensive that they were WAY out of our realm of possibility. So I decided to make one.

We bought an inexpensive coffee table from Walmart. It was $29 at the time:


And a few Lego building plates (I think I ended up using 3 and 1/2). I also found these at Walmart:

I laid them out and measured and cut the pieces until the table was covered. This was more difficult than I expected, but a sharp box cutter and a little patience finally got the job done :-) I'd seen a larger homemade table that had a field of green in the middle with the racetrack building plates along the outside, but we didn't have that big an area to work with. And the plain plates were cheaper ;-) But I did want to personalize it and add some color.

So I painted the thinner strips along the top with red spray paint and then adhered the plates to the table with my handy hot glue gun. Then I painted my son's name on the red pieces with a small paint brush and white paint. 


We still needed something to contain all the Legos though, so I bought two mesh laundry bags (Target has them for under $2


and stapled them to the underside of the table with a heavy-duty stapler.


My son absolutely loved it. I made this for him for Christmas last year and he still plays with it daily. My daughter has asked for one for her room also :-)


All in all, we spent about $100 to make it (those building plates are kind of pricey at about $14 a piece). But considering that the cheapest table that was large enough for my 9 year old to play on was at least twice that much (and in most cases more like 3-4 times as much) this was a wonderful way to save some money and give him the table he'd been wanting :-)


Wednesday, April 9, 2014

Book Page Beauty

I have a houseful of books. They are everywhere. And I love it :-D But every now and then I end up with a book I either don't want, or it's been damaged in some way so I can no longer read it, or give it away. But throwing any book away makes me absolutely cringe in horror.

Luckily, there are people out there who are much more creative than me :-) I will definitely be trying to make a few of these gorgeous book page beauties in the near future :-)


I'd love to renew my vows just so I can carry one of these :-D


You absolutely must check out The Nesting Place - she has 20 ways to decorate with book pages and they are AWESOME ya'all. This book page wreath is one of her ideas.

And this...I can't even tell you how much I want this :-) Absolutely stunning clock made from sheet music.

Found on Pinterest linked to My Sweet Savannah. Check out her site, it's amazing!


Wednesday, March 19, 2014

10 DIY Spider Repellents

I love spring. One of my favorite times of year. One thing I do not love....SPIDERS *shudder* Can't stand the little buggers and since I am out in the country, those little buggers get pretty big.

But, I also have two kids, three cats, and one dog in my house, so I'm not a huge fan of spraying poison willy-nilly about the place. So this year, I've been researching some natural repellents that supposedly work really well that I will try out.


1. Plant mint and lavender around the house
This one I am looking forward to. Both plants are lovely and smell wonderful, so even if they don't keep the spiders at bay, they'll improve the look of the place.

2. Essential Oils
You can make your own spider spray using essential oils. I've found several different recipes:

  • 5 drops of essential oils, 5 drops of liquid dish washing soap, and a quart of water. 
  • 10-15 drops of two scents in a spray bottle full of water
  • 20-30 drops in a quart
When it comes to spiders, I tend to go with the "more is better" mentality, so I will probably try the third option :)

The oils that I've read work best are:

  • citrus
  • peppermint
  • lavender
  • cinnamon
  • tea tree
  • citronella
  • eucalyptus 
  • neem
  • rose
Citrus and peppermint seem to be the ones most people swear by. Again, it'll make the house smell amazing even if the spiders don't disappear, so it can't hurt, right?

3. Citrus juice
Spiders supposedly hate this, so you can mix any sort of natural or sugarless citrus juice with water and spray where necessary. I hesitate to use this one because I don't know if it will attract other bugs and, having children, I know how sticky citrus juice can be. However, you can also use this to spray on your outdoor plants to keep spiders away, so it made the list. You can also leave citrus peels around your garden to deter spiders there.

4. Vinegar
This stuff seems to be a super ingredient. From cleaning to bug repellent, it can apparently do it all which means I'll be hitting Sam's Club soon to stock up :) For spider repellent, you just combine equal parts vinegar and water in a spray bottle and go to town. You can also add this to your essential oil spray from #2, and is needed for numbers 8 and 10.

5. Tumeric
This seems to be another super ingredient. I've read several uses for this stuff, but a spider and bug repellent is another one. It's a spice you can find in most grocery stores and all you do is combine it with some water to make a paste and smear it wherever you have a problem area. It's supposed to work particularly well for insects like ants. However, this will leave yellow stains so I wouldn't use this on anything but tile and I'd test a small area first.

6. Garlic
Just add a few cloves to a spray bottle of water and start spritzing. I think I'd prefer the essential oil scents though...

7. Tomato Leaves
Blend tomato leaves with 4 pints of water and 1 tablespoon of cornstarch and use in a spray bottle.

8. Coconut Oil
Yet another use for this awesome stuff! Use 1/2 oz in 1 quart of white vinegar in a spray bottle. STAIN ALERT - this one supposedly stains as well so use with caution.

9. Catnip Oil
This one is supposedly very effective. You can buy a catnip plant, bruise the leaves, and rub them on problem areas or on baseboards/windowsills/corners, etc. I do wonder how it would effect the cats in the house though...they are already pretty crazy...

10. Spicy Spray
Use 1/2 vinegar and 2 tablespoons chili powder or hot chili sauce, shake, and spray. This is supposedly very effective but I think the smell would kill me.

Now I know spiders are good (theoretically) and they help keep other nasty bugs away. So I do try to leave them alone when they are outside. (Except for my porch area....my kids won't go out on the porch if the spiders are there and we've had them get big enough that my husband was able to shoot one with an air gun instead of using a fly swatter which means the sucker was REALLY BIG. So, I keep the porch as spider free as possible.) Other than that, I use a "I'll stay out of your way if you stay out of mine" approach to spiders.

However, one got into my husband's shower poofy last year and chomped him when he went to use it. It was huge and nasty and the bite felt like a bee sting and was fairly horrible looking for several days. So this spring...my house will be awash in the aroma of lavender, mint, and citrus and I'll keep you updated as to whether or not the spiders make an appearance :)

Do you have any tried and true spider or insect repellents? 

Tuesday, March 4, 2014

Put Some Coconut Oil On It

This stuff is AWESOME. I can't even tell you. You can seriously use it for everything from cooking to soothing a rash. It's extremely healthy for your body, inside and out, and has a zillion practical uses as well.


It was a little pricey at our local grocery store so I stopped buying it for awhile. But I recently found it at Sam's Club for $8 for a 20 oz jar so I stocked up :-) (at the grocery store the jar was half this size for a couple dollars more). You can sometimes find good deals online as well. The good thing is a little of this stuff goes a very long way, so it lasts a while.

Currently, it is our #1 go-to as a lip balm. My son gets horribly chapped lips, but he REFUSES to put anything on them. I even bought him a super cool, Star Wars chapstick that was colorless, odorless, tasteless, and looked like a light saber (it had a light on it so it glowed red when he turned it on).

He loved it....as a toy. Wouldn't get it anywhere near his lips. I have to sneak into his room a couple times a night to put lip balm on him. Not fun.

Then I had someone tell me they used coconut oil as a lip balm, so I tried it out. LOVE IT! It is soft, silky, and instantly soothes chapped lips. And the best part - my son will use it! I should have known he'd have no problem rubbing food on his face ;-)

And when I say a little goes a long way, I'm not kidding. To generously cover both his lips (and the chapped areas above and below his lips) I only need to scrap a tiny amount on the tip of my fingernail and it covers all the problem areas.

Here are a few of my favorite uses for this awesome stuff:

Lip balm
Body lotion
To cook with as a butter replacement
In smoothies
On mosquito bites
On my son's eczema (just found this one, we'll be trying it next time he flares up)

I googled around and here are a few other awesome uses:

As a natural SPF 4 sunscreen
Mixed with salt to remove dry skin on feet
Rub a little inside your nose to help with allergies
Anything baby related - as a diaper cream, baby lotion, to help with cradle cap, as a nipple cream for nursing moms (and it can help treat thrush)
As an eye makeup remover

And, one of my all time favorite uses and the reason I started buying the stuff.....you can make a healthy chocolate snack out of it :D 

Here's the recipe (which I found on this awesome blog):

I prefer to use agave as a sweetener, but you can also use liquid Stevia drops, maple syrup, honey, or any liquid sweetener. This is what I do:

  • 1/4 cup cocoa powder 
  • 1/4 cup coconut oil (melted) 
  • 1 Tbsp agave nectar (this is the original recipe - I played around with the amount a bit to make it a tad sweeter as my kids don't like dark chocolate. It makes it taste a little fruity, but it's yummy!)
  • Optional - different flavored extracts or other add ins (crispy rice, nuts, etc)
Combine the coconut oil with your sweetener, then stir in the cocoa powder and stir until it's totally smooth. Then pour into any flat container and freeze until it is set (store in the freezer).

Simple, yummy, and healthy! :D

Tuesday, February 18, 2014

DIY Laundry Soap

I found a recipe for homemade laundry soap on Pinterest (originally from the Being Creative To Keep My Sanity blog) and decided to give it a try. And I LOVE it. It costs about $20 to make and lasted me almost 5 months. The lady who originally posted this recipe said it lasted her 9 months. That's just phenomenal! My clothes smelled wonderful and they got just as clean, if not more so, than with regular detergent.

Here's the ingredients:

One 4 lb 12 oz box Borax (2.15 kg or 76 oz)
One 4 lb box Arm & Hammer Baking Soda (1.81 kg)
One box Arm & Hammer Super Washing Soda 55 oz (3 lb 7 oz)
Three bars of Fels-Naptha soap (shave them using a hand held cheese grater - I tried to use a food processor...this did NOT work well for me but others have said it works okay for them) :)
Two small containers of Oxy Clean or store brand Oxy Clean (you need about 3.5 lbs total (1.58 kg) (this is optional but I added it))

I found all of these items at Walmart in the laundry aisle. I also added some laundry crystals for the scent.


I lined a box (or a bucket would work) with a garbage bag and mixed everything together.
The Fels-Naptha bar shavings look like grated cheese but they dissolve great, 
even just washing with cold water.

I found this glass jar at Walmart for about $7 to hold it all.

It only takes a tablespoon or two per load, so this lasts a very long time. The plus side to making this...it makes your house smell INCREDIBLE for several days :D